+1 (786) 9168920 24/7 Miami Fl

Security cameras naples

Security cameras naples

I do not wait for tomorrow.

4.8/5 - (5 votes)
your safety today is important.

take care of your loved ones, and their properties.

latest technology in security cameras.
do not be fooled.

We guarantee our work.

More than 20 years of experience certify us.

call now : (786) 916.8920

recording in up to 10 mp

we are simply the best in security systems.

(786) 916.8920

An innovation to the PTZ camera is a built-in firmware program that monitors the change of pixels generated by the video clip in the camera. When the pixels change due to movement within the camera’s field of view, the camera can actually focus on the pixel variation and move the camera in an attempt to center the pixel fluctuation on the video chip. This results in the camera following movement. The program allows the camera to estimate the size of the object which is moving and distance of the movement from the camera. With this estimate, the camera can adjust the camera’s optical lens, zooming in and out, in an attempt to stabilize the size of pixel fluctuation as a percentage of total viewing area. Once the movement exits the camera’s field of view, the camera returns to a pre-programmed or “parked” position until it senses pixel variation and the process starts over again.

Security cameras winter haven.

What is a PTZ camera?

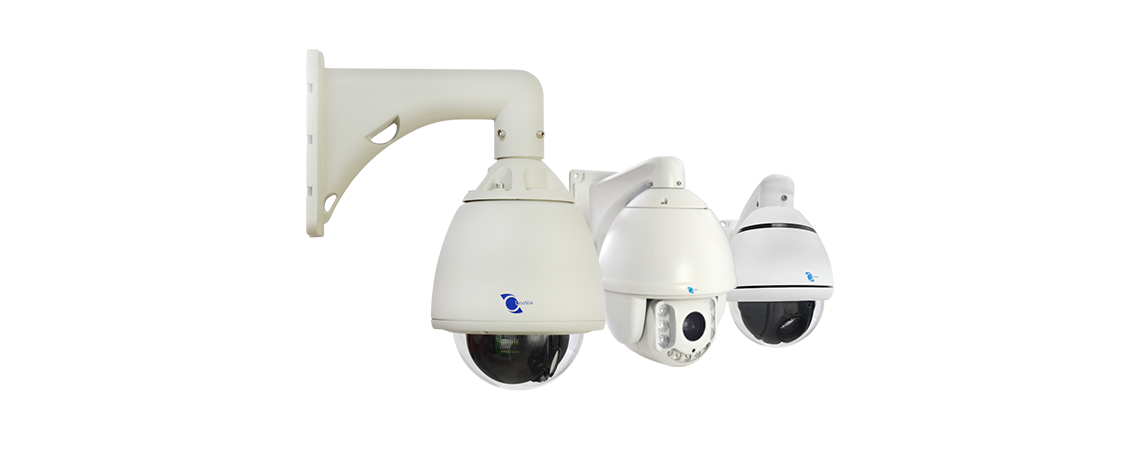
A: A Pan-Tilt-Zoom (PTZ) camera is a specialized security camera that can change direction and zoom in and out based on commands given from a DVR. Some DVRs support remote control for PTZ cameras over the Internet using a mobile device or computer, allowing you to control the camera’s movement from anywhere in the world.

PTZ cameras can be used to cover much larger areas than stationary cameras with a full range of horizontal and vertical movement (pan and tilt respectively). Illustration of PTZ pan and tilt movements
Demonstration of PTZ zoom capabilities PTZ cameras have an adjustable field of view, meaning they can capture large areas and also quickly zoom in to capture fine details in a scene, such as a face or license plate.


Security cameras winter haven.

Q: What are PTZ protocol, baud rate, and ID settings?

A: The camera’s PTZ protocol information allows a DVR to communicate with it and control the camera’s movement. On most PTZ cameras, protocol information is set using DIP switches inside the camera (see the image below). DIP switches represent binary values. This means that they are either On (1) or Off (0).

Example of DIP switch panel on a PTZ camera

PTZ protocol information pertains to 3 values:

  1. The ID of the camera, which allows the DVR to identify different PTZ cameras. You cannot use the same ID for more than 1 PTZ camera, and you cannot set an ID value of 0.
  2. The protocol, which is the language that allows the camera and DVR to speak to each other (e.g. Pelco D).
  3. The baud rate, which is the frequency of communications.

TIP: Lorex PTZ cameras display the configured PTZ protocol information upon starting up. To quickly display this information on the monitor, disconnect and reconnect the camera power adapter.

See the instruction manual provided with your PTZ camera for the correct protocol settings and instructions on locating the camera’s DIP switches.

Security cameras winter haven.

Q: How do I connect a PTZ camera to my DVR?

A: The diagram below shows the full installation of a PTZ camera, followed by complete setup instructions.

NOTE: The diagrams and images shown in this section are for illustration purposes only. Components may vary in appearance depending on the model and manufacturer of your PTZ camera and/or DVR. See the instruction manual provided with your security product for full details.

Complete installation diagram for a single PTZ camera installation

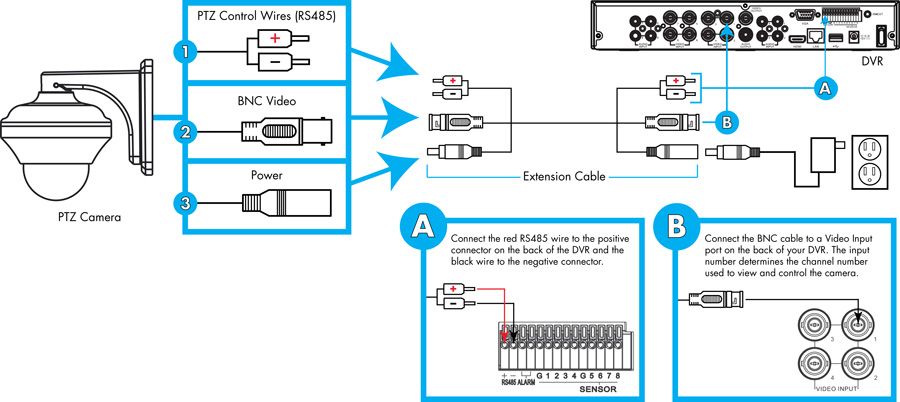
You must use the following connections:

  1. PTZ Control Wires (RS485)
    • Use a screwdriver (not included) to loosen the 2 screws on the RS485 connection block attached to the camera.
    Loosen 2 screws on RS485 connector across from the pre-connected wires
    • Insert the RS485 wires from the extension cable into the RS485 connection block, matching the polarity of the cables coming from the camera (red to red, black to black). Tighten the screws on the RS485 connection block to secure the wires in place.
    Insert the PTZ control wires into the RS485 connector
    • Connect the RS485 wires from the extension cable to the RS485 connectors on the DVR, matching the polarity of the cables coming from the camera (the red wire connects to the + port, and the black wire connects to the – port).
    Inserting PTZ control wires into the DVR

    Security cameras winter haven.

  2. BNC Video
      • Connect the BNC cable to a Video Input port on the DVR.
      • Make note of the port number where you connect the camera, as it will be used when configuring the DVR to communicate with the camera.
  3. Power
    WARNING: The camera will begin moving immediately when power adapter is connected. Do not position the camera in a way that blocks movement or the camera could be damaged.

    • Connect the power connector to the included power adapter.
    • Plug the power adapter into a power outlet.

You will need to enter some information about the camera into the DVR menu so that it will recognize and communicate with the PTZ camera. Click here for details on the information required.

Security cameras winter haven.

Q: How do I connect multiple PTZ cameras to a single DVR?

A: The diagram below shows the full installation of multiple PTZ cameras on a single DVR, followed by complete setup instructions.

NOTE: The diagrams and images shown in this section are for illustration purposes only. Components may vary in appearance depending on the model and manufacturer of your PTZ camera and/or DVR. See the instruction manual provided with your security product for full details.

Complete installation diagram for multiple PTZ cameras on one DVR

    1. Ensure each PTZ camera has a unique ID setting (e.g. PTZ 1 – ID# 001, PTZ 2 – ID# 002). Click here for details.
    1. Connect cameras to video and power as shown in the previous section.
    1. Connect the RS485 wires from each camera to its own extension cable using the RS485 connection block as shown in the previous section.
    1. Connect the RS485 wires from the opposite end of each extension cable to an extra RS485 connection block (included with LZC7091B & LZC7092B). Insert both red wires into one side of the connector, and both black wires into the other side. Insert a 24-gauge wire (not included) opposite to each set of RS485 wires. See the image below.Inserting RS485 cables into extra RS485 connector

Security cameras winter haven.

    1. Insert the 24-gauge wires into the RS485 ports on your DVR, matching the polarity on the cables coming from the camera (the wire across from the two red wires connects to the + port, and the wire across from the two black wires connects to the – port).Inserting 24-gauge wires into DVR

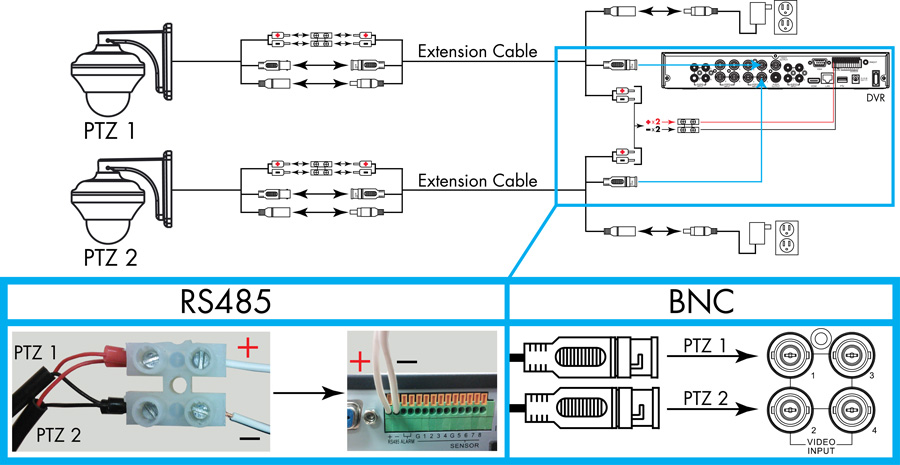
You will need to enter some information about each camera into the DVR menu so that it will recognize and communicate with your PTZ cameras. Click here for details on the information required.

Q: How do I control the movement of a PTZ camera?

A: Once your cameras are connected to the DVR, you must perform initial setup to control the cameras using the DVR. Once this setup is complete, you will be able to move the cameras, configure preset positions, and use other advanced controls. The level of configuration will depend on the features supported by the DVR. The instructions in this section are based on the Lorex ECO Series DVRs. For other models, see your DVR’s instruction manual for details.

To setup PTZ camera(s) using a Lorex ECO Series DVR:

NOTE: Turn off motion detection on your DVR for the channels with PTZ cameras connected. Otherwise, the DVR will detect the PTZ movement as motion. See your DVR’s instruction manual for details.

    1. Ensure the PTZ camera is connected to the DVR correctly according to one of the connection methods described in this article:
        • Click here for details on installing a single PTZ camera.
        • Click here for details on installing multiple PTZ cameras on a single DVR.
    2. (Multiple camera installations only) Ensure each PTZ camera has a unique Camera ID. Click here for details.
    1. On the DVR, right-click with the mouse to open the Menu Bar and click the Main Menu button (Menu button).
    1. Click Device and select the PTZ tab.
  1. Configure the following for each PTZ camera you wish to setup. See the instruction manual provided with your PTZ camera for the correct protocol and baud rate information:
    • Channel: Select the channel that you connected the PTZ camera to.
    • Protocol: Select the protocol (e.g. Pelco D).
    • Baud Rate: Select the camera’s baud rate (e.g. 9600).
    • Data Bit: Select 8.
    • Stop Bit: Select 1.
    • Parity: Select None.
    • Cruise: Select Enable to enable PTZ cruise.
    • Address: Enter the camera’s ID (e.g. 001). You cannot use the same ID for more than 1 PTZ camera, and you cannot set an ID value of 0.

    TIP: Lorex PTZ cameras display the configured PTZ protocol information upon starting up. To quickly display this information on the monitor, disconnect and reconnect the camera power adapter.

  2. Click Apply to save your settings.

To control PTZ camera(s) locally using a Lorex ECO Series DVR:

    1. Select the channel that the PTZ camera is connected to.
    2. Right-click with the mouse to open the Menu Bar and click the PTZ button (PTZ button).
    1. Enter the DVR password (default: 000000) and click Apply.
  1. Use the on-screen PTZ controls to control the camera:

    On-screen PTZ controls

    1. Channel: Select the channel the PTZ camera is connected to.
    2. Direction Keys: Click to pan and tilt the camera.
    3. Speed Slider: Increase or decrease the pan and tilt speed.
    4. Zoom/Focus/Iris Controls
    5. Preset Controls

    See the instruction manual provided with your DVR for full details.


Security cameras winter haven.

(786) 916.8920